Showing posts with label needed accessories. Show all posts

Sunday, 15 October 2017

14/10/2017 - New custom vinyl stickers...

Life is about good times and fun so IMHO you need to keep your sense of humor alive until they day you die because you never know when your day will come.. 


Saturday, 30 September 2017

30/9/2017 - new white steel rims and beaches


It’s been on my mind a while to do this after my last major mods when I got my bash plate, snorkel and ladder sandblasted, galvinized, and powdercoated; I finally got new white steel rims to replace my original alloy rims.   

The after effect is a very colourful match and these new rims are able to handle larger tyres such as 31” or 32” tyres.  


Friday, 9 June 2017

28/5/2017 - Mods complete - now I have got massive lights & a VHF radio

1) Removed and sandblasted the bull-bar/bash plate/snorkel/rear ladder
2) Galvinised them all!
3) Powder coated everything!


Sunday, 26 March 2017

27/3/2017 - Sandblasting, galvinising and powder coating along side new UHF radio & LED HD lights (Part I)

Even though I already have a really nice portable, waterproof/submersible, UHF 5 watt radio/GPS receiver and a nice 4000 lumen LED bar on my van's bull bar, I wanted more lights and a real CB style radio.  So I ordered the following items as such and took my van to a 4WD specialist here in Sydney.  
AE4703 UHF h/D Radome Antenna, 6.6 dBi
My new CV radio - GME TX3100DP Super Compact UHF
Additionally, for a while now I have been wanting some work powder coating work done on my van. Namely I wanted to get the growing rush problem off my rear ladder, bull bar/engine bash plate and my snorkel. You see when this custom work was originally done,  I didn't have the budget for powdering so I went with standard painting. I guess living on the ocean I paid the price with rust!   Anyway check out the rust on this baby!

My bull bar alone removed from the front and underside of the van

This was just added - a platform for my new lights and an antenna holder.

My bull bar, bash plate, rear ladder and snorkel all ready to get fixed up nice!
This is just part 1 of this post because part II will be when its finished and looking all flash!  This is going to take some time to get this all sorted, so please do keep tuned in for more!

Monday, 13 March 2017

13/3/2017 - From Australia, it's time for hunting! Let the adventure begin!


It's been a long time since I have posted a blog entry.  After pain and trial, I finally imported my van across the Tasman Sea to Australia.  Now, its time to start exploring this great country.  Also, after getting my NSW firearms license, what else is there to do but
get a permit to hunt zombies?   :)


Wednesday, 6 July 2016

6/7/2016 - Major modification - Rear open diff conversation to L.S.D. (Limited Slip Diff)


It's been a while since I have had a major modification done on my van.   The only thing I thought I could've done more was to add a hot tub (which wouldn't fit anyway), a diesel heater, an electrical water heater or completely swapping out my rear differential to a locker or limited slip diff.   

My rear axel off and naked! 

The hot tub idea is not going to work obviously!
A diesel heater?  Perhaps I don't quite need it now since I have good insulation and -9c down sleeping bag.


I did however Think long and hard about swapping out my rear open diff to get a locker installed.  I looked at the pricing and it was far out of my price range.  So I look into getting a limited slip diff, but the problem is there are no factory ones available for this van. So G Guy Motors started doing research on where I can get one. Farther north up in New Plymouth, there was a Delica L400 which was recently totalled from an accident or something.  The L400 shares the same chassis as my van, less the rear limited slip diff. 


G Guy Motors had this LSD tested and it was in perfect working order. The supplier mailed down the LSD and the work began my van. The cost of the part was about $450-500, however once install it will provide a lot more traction in my current rear open diff.  Now I'm not mechanic but I can tell you it looks very impressive.


I'm looking forward to taking this off-road especially taking it off road in the snow.

Thursday, 31 March 2016

31/3/2016 - More mods! Custom vertically mounted ski rack & auxillary LED reverse lights...

So its been a few months since I have made any modifications to my van.  Ah-ha!  I found a need that has yet to be unfulfilled so I hired G Guy Motors again for some new custom modifications.

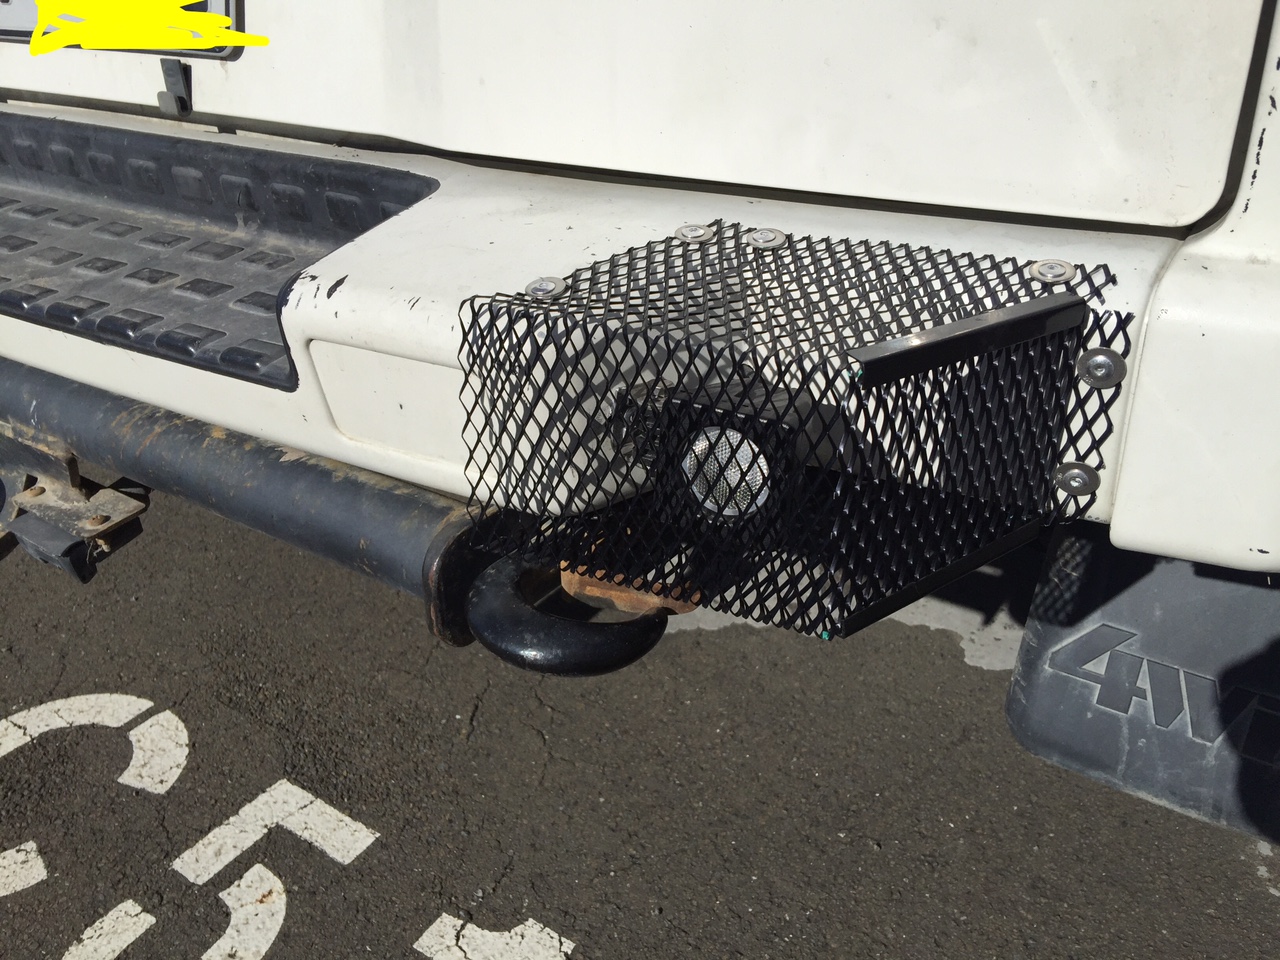
#1 - LED reverse lights:  I realised that my limousine tinted windows on my van make my factory reverse lights more or less useless for seeing backwards during reverse mode. In fact they were only 50% operational (they flickered a lot) at best.   So I purchased a set of 2 - 350 lumen white LED lights.  G Guy not only installed them with a switch on my dashboard which allows me to always use them when in reverse mode, but also to use them at specific times such as for off-road use only.  The problem "was" that during the day, the new reversed lights were fine, but at night they are far too bright and can blind a driver behind me.  So the switch option resolves the problem.

Adding that, G Guy also installed some protective steel mesh covers for these new reverse lights. Magnificent results!  Check out the photos...


These covers can protect the lights against theft and damage

2 - Custom vertically mounted square bars -  I am die hard skier and have been since I have been a little kid @ 7 years of age. I realised that my expedition van can go anywhere, but what happens when I go skiing?  Yeah right - putting my wet skis inside the van on my bed??!  No thanks!  So I had drawn up some designs for my Thule Euro-style 2 pair ski carrier.  I contacted G Guy and asked if they could help me out. I told them I wanted these bars removable, but lockable.   Craig at G Guy designed a perfect solution where the bars are lockable with standard waterproof locks and are easily removable.  All of the custom bar components are powder coated so they'll never rust.  
Everything except the skis on here.  I can now hold 2 pairs of skis securely!!!

Euro-style ski carrier on custom vertically mounted bars.  

After removing the bars & racks, the base clips remain. These 2 clips are
secured with sheer nuts & bolts (security nuts/bolts) so they cannot be stolen

#3 - Max Traxx holder Powder Coated 

While I had a max traxx holder already installed from last year, it was rusting away because it had never been powder coasted.  So had G Guy remove them from my roof rack and gotten it powder coated black. I did not picture here for this one simply because it's on the top middle of the van!  

Saturday, 12 December 2015

12/12/2015 - new Monroe 4x4 Adventure shocks, 50mm raise, new springs, ready for 30 day trip!

So my final major modification, 4 x 4 Monroe Adventure shock upgrades all around, is done. It was not cheap, but well worth the hit to my Visa card (will pay off when the next bill comes!).   I got the following mods done to my van:


a) Monroe 4x4 Adventure Shocks (4x)


b) My van was raised by 50mm (2") in the rear and 25mm (1" in the front)


c) Loads more clearance under the back 2/3 of the  van now! 


d) Risers on the rear axel
e) Removed my extra "fancy 4WD" step bumper from the left side to avoid getting high grounded in rocky condition. I still have the step inside the van! 


Besides going a food shopping trip just before I leave on the trip to fill my 41L fridge, the van has been fully modified is ready for anything (more or less).    My next blog entry will be for the first day of the trip or just afterwards...

Wednesday, 9 December 2015

10/12/2015 - Stocking up with GPS/radio, 2 stoves, new machete, etc


Garmin Rino 650 - GPS and 5Watt VHF
radio with altimeter & more! Dash mount included!

13" Machete for hunting, fishing, wood cutting,
and taking down zombies...
With about 8 days before my big trip - 30 days 4WDing on New Zealand's south Island, I'm starting to organize all my important survival gear.  I pack my fly fishing gear including waiters, net, 4 piece travel rod, and a whole bunch of custom flies already in the van.  I have a surfcasting rod as well with a really nice real in 15 pound test on.  I'm not sure about my fishing lures for saltwater, etc so I'm going to stop in a fishing supply store somewhere down south island to make sure I have the right stuff. No worries though.

I went shopping today and I have a new machete.  Ironically I got to test the machete today because I am cooking a lamb's leg and had to chop it in half in order for it to fit in our pot.  Since it is a full-size lamb leg with thick bone, I put it on our cutting board and with only one simple swipe of my new machete it cut through it like a hot knife does through butter.


Wow!  I guess I have my zombie apocalypse weapon.. No ammo required(!??!?!) < evil laugh!!!>

I picked up the machete at the local hunting and fishing store.  I also picked up my MSR XGK II stove with the pump. The stove and the pump were being check for faults by an authorised MSR repair centre nearby.  I'm really glad I got a check because the jet burner was broken/ very faulty, and they said if I would've turned it on it might have exploded on me.  They replace some O-rings on the pump, and gave it a good clean.  So even though my XGK stove is about 10 years old, it's now running like new!  I have another stove in my van already and it's the MSR Whisperlite Interational.  Both of the stoves serve specific purposes for me:

XGK II - is the ultimate mountaineering and cold weather portable stove.  It boils 2L water in about 1.5 minutes

Whisperlite International - is a globally recognised reliable stove that is for cooking, boiling and simmering.  While I could use it for boiling, I prefer to use my XGK as it is faster.  This way I can boil water for coffee or tea using the XGK, while cooking on the other Whisperlite International.

Tomorrow afternoon I get back my van from G Guy Motors with four new shocks, new custom springs, my lower step bumper removed and my newly replaced 400watt LED bar for my bull bar. I'm getting quite excited here!!!  Eight days from now,I depart on my 30 day/ 4WD trip to New Zealand's south Island....

Saturday, 14 November 2015

15/11/2015 - Minor Mods: X-mas lights, prayer flags & Anti-mosquito wall

So on a bad weather Sunday, I deciced to take care of some well-need minor mods that cost close to nothing:

a) Anti-Mosquito Wall (between front cab & living in the back)


I used netting from an old anti-mossy net for the living area of the van.  I trimmed it off an old bed mosquito covering which was not being used.  So rather try than cut to fit, I did the following:

1) Glued the soft fuzzy of the velcro to the arch over the wheel hump.
2) Put matching prickly velcro on it with the sticky side out.
3) I spread the netting just over the fringe of the sticky side.  It instantly sticks to the net.
4) I cut matching cardboard strips to glued them onto the sticky netting.   Let it dry-- it does dry quickly!
5) I removed the prickly velcro/cardboard netting attachment.
6) Finally I trimmed off the excess from the just rearward of the cardboard strip.
7) It doesn't pack well in a sack for storage, but I will give this a go for a while.  :)


b) Xmas Lights


Everyone likes Xmas lights!  :)

This was quite easy.  Just plug the one-way strip of lights into the power strip (which is plugged into the 600W interverted which is plugged into the deep cel batter with goes to the solar panel).  The after use some special pins that allow to hang lines to hold them up on a interior van wall.  This strip is 4.95m and is perfect length for the rear of the the Delica Starwagon.

c) Nepalese Prayer Flags at sliding door entry


These were very easy to install as well.  Just cut off 6-7 flags off the master string of flags.  Tied one end to an eyelit already installed to the left of the front passenger seat.  I used the already installed curtain wire over the sliding door with white plastic curtain holders to hang the flags like curtains to flutter in the wind!

Having these installed is special because I actually bought these in Nepal back in 2010 on my Mt. Everest basecamp trek 30 day trip.

When these flutter in the wind, ancient Buddist writings said they spread love and good spirits to anyone nearby!  

Sunday, 1 November 2015

2/11/2015 - Custom SolarShades installed - imported from Australia

After some delays from Australia, I got my well-needed Solarshades from SolarScreen Australia.  While not cheap, they are a must have for anyone who values warmth in winter, coolness in summer and privacy.


Solar shades all installed for daily parking or sleeping mode


Solar shades all installed for daily parking or sleeping mode

These are almost light proof except the stitching on the shades themselves.
The window sun visors are NOT holding up the windscreen solar screen

Very very very nice indeed. The top left corner of the front cab windows were
cut out like this to give a little light and for a peep hole to the outside world.

I like how the suctions are strong, but still not too hard to remove. I think winter camping will be a blast.   I thought about getting an RV-style diesel heater like this installed, but I will give winter camping a go without it.  After all if a warm mummy sleeping bag and window insulation is enough, that's a huge cost savings for me.

Next major modification are the 4 new shocks and custom fabricated rear springs to make up for the extra weight of my van as compared to the usefulness of the base factory shocks/springs.  This modification won't get getting done until early December however... (its too expensive!  LOL!)

Sunday, 25 October 2015

26/20/2015 - Minor Mod- interior fishing rod holders fitted

In anticipation of many long 4WD camping/fishing trips, I had to find a way to have my fishing rod at the ready, easy to reach, yet stored with stability for the bouncy 4WDing.  So I utilised my power drill/screwdriver kit, industrial strength velco and glue, and a minor bit of engineering.   I fitted my heavy strength freshwater / medium weight surf casting rod to the inside. 
This is not going anywhere!  Even with rough 4WDing I am sorted here!

In order to make even the best velcro adhere to a factory Delica interior roof, you're not only going to need industrial strength velcro, but also some serious industrial strength glue, small brass 1/2" screws, a phillips head manual screw driver and a power drill/screw driver.  You'll need your actual fishing rod with you in order to do this properly/accurately. Here you go; this is based on a 2 piece/9' long fishing rod:

1) For each adhesion point, cut a enough velcro (fussy/soft) to lay down perpendicular to the length of the van.  (I recommend 3 velcro straps/adhesions for the thicker 1/2 of your fishing rod) as shown below)
2) Use your glue to glue it down to the factory roof with the softside up. Glue goes on the velcro adhesive side of course!   Be careful to be sure to align it right before doing this!!!!
3) Let it dry for at least 5-10 minutes!
4) With your power drill/screw driver, drill a small screw on the end of glued on velcro on the INSIDE of the van (farther away from the window!)
5) For the other side matching of the velcro (depending on how wide your rod is at that point), cut at least 120% of the length of glued down part.  Test the length first BEFORE cutting your velcro.
6) With your power screw drover, use your freshly cut stip and screw together the velcro at the end(s) where the window is closest.
7) If you have the same issue as me, you'll see the power drill has too much torque because the velcro together get all twisted up.  So reverse the screw out a bit. Take a phillips head screw driver and slow manually tightening it up. Make it smooth and use your fingers to make sure its nicely done otherwise the velcro will never line and work well.
8) Remove the fishing rod, and note down where it was being held in place.
9) Use your power screw driver to drill another screw into ONLY the backing (the glued part) at the same spot from step 9. Do NOT screw both side of velcro together again!  
10) When you're done one of them, it should have 3 screws on the velcro backing and look like this...


11)  Repeat 2 more times and when cutting the velcro take into consideration the thickness of the fishing rod where your velcro will be.  
12)  Repeat steps 1-10 for the thinner end of your rod on the sliding door side of your van.  Be careful of lengths of the velcro you cut as this piece of your fishing rod is usually far thinner hence less material will be needed. You should only need 2 strips for this piece.


The heavier base of my fishing rod on the NON-sliding door side of my van

The second and thinner piece of my fishing rod with only 2 velcro points required...


Enjoy and good luck fishing!  :)